Teaching students to type diacritics in a lab setting using Google Documents and the American International Keyboard

Sample shared Google document for typing diacritics: https://docs.google.com/document/d/15e4N-uIuTDFfWq-k_cv1fp_3bBuoFDJf7s-OZdMBb6Y/edit?usp=sharing

  As a Lecturer who provides weekly lab sessions and computer-centred activities for 6 different language modules I need to make sure that students will be able to type diacritics (accent marks) for their French writing projects.

  To be able to type diacritics is a very important skill for anyone writing in the different languages that use them. Often students resort to copy and pasting accented letters from online widgets and websites when a much faster method is available which is native to any PC using Windows.

The method I teach is to use the American International Keyboard, and the way I implement and get students to practice together is through a shared Google document where they can type alongside each other and see how everyone else is coping. When you share a Google document between a 20 or 30 student-strong group it is fun to see typing happening all over it at the same time; it looks a bit like modern art.

This short session can be repeated in the first class at the beginning of each year, at all levels, since students are sometimes prone to forget how it works and need reminders. For those in first year, it provides them with a precise and fast method of typing diacritics for the entire degree course, and dare I say, for the whole of the rest of their lives.

STEP 1: Add the American International Keyboard to your PC

a) Go to the Control Panel (via the Start Menu for any Operating System up to and including Windows 7, or the right hand-side pop-out menu column for Windows 8)

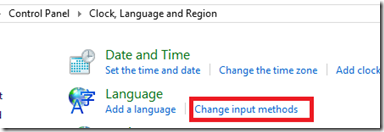
b) Select Language/ Change input method (for now I am doing this on a Windows 8 machine. I’ll later add a link to a tutorial for any operating system up to not including Windows 8)

Change input method


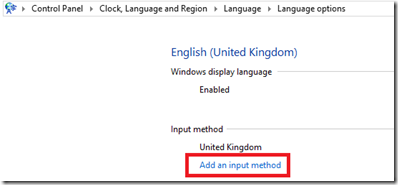
c) Add input method

Add input method


d) Go to ‘Options’

Input options


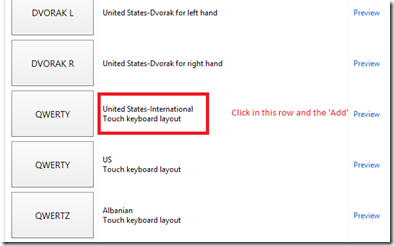
e) Select United States-International and then click ‘add’.

 International Keyboard option

f) Check in the language icon in your toolbar that ENG INTL is selected  and if it is not click on the icon and select ENG INTL

Toolbar info

You are now ready to type diacritics and you will only need to go through the process of adding the American International Keyboard once for each computer that you use.


STEP 2: For the sake of the demonstration you may want to show the On-Screen keyboard.

Go to the Search in Windows 8 and type: On-screen in the search field. Click on ‘On-Screen Keyboard’.

See attached tutorial for operating systems such as XP, Vista, Windows 7: Go to ‘Start Menu’/ ‘Programs’/ ‘Accessibility’/’On screen Keyboard’


STEP 3: Go to your Google Drive account and create a document.


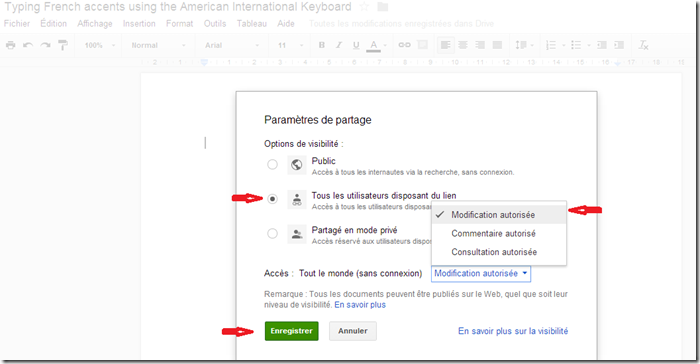
a) Go to the ‘Share’ settings and make the document editable for anyone with the link.

Google doc sharing settings

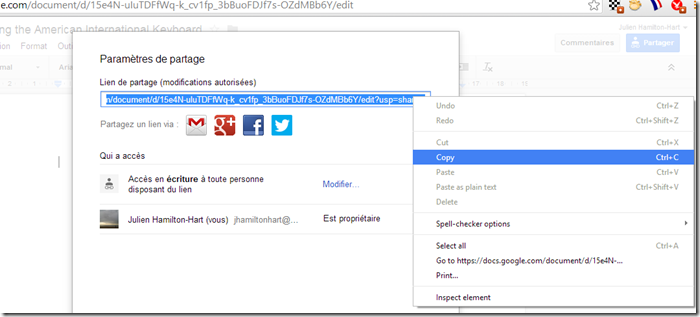
b) Copy the link to the document and paste in a place where your students will be able to access it. This can be in a VLE such as Blackboard, or in a Blogger blog that you give the address to via the projection of the tutor computer on the board or via a piece of paper where it is printed. You may also share directly via Facebook or Twitter.

Copy link of Google document


c) Create a Table in your document with more than enough fields for each student to each be able to populate one of them. If you do not create a Table within the document, each user of the document with write over the top of other users and it becomes impossible for anyone to see what they are typing.

Make a table in Google docs

Here is a sample document: https://docs.google.com/document/d/15e4N-uIuTDFfWq-k_cv1fp_3bBuoFDJf7s-OZdMBb6Y/edit?usp=sharing
STEP 4: Explain and demonstrate to students how to type diacritics.

Once all students are on the Shared Google Document and each within a different square within the table, ask them to try the following sequences to type accents and diacritics:

à : Click and release the reverse apostrophe symbol [`] and then the [a] key.

è : Click and release the reverse apostrophe symbol [`] and then the [e] key

é : Click and release the apostrophe symbol [‘] and then the [e] key

ê : Click and release the circumflex symbol (usually SHIFT>6) [^] and then the [e] key.

â: Click and release the circumflex symbol (usually SHIFT>6) [^] and then the [a] key.

î : Click and release the circumflex symbol (usually SHIFT>6) [^] and then the [i] key.

ô : Click and release the circumflex symbol (usually SHIFT>6) [^] and then the [o] key.

û : Click and release the circumflex symbol (usually SHIFT>6) [^] and then the [u] key.

ë : Click and release the @ symbol (this takes the place of the quotation mark [“]symbol in the International American Keyboard Layout when using a UK keyboard. If you are using a US keyboard then click the [“] symbol on your keyboard.) and then the [e] key.

ï : Click and release the @ symbol, and then the [i] key.

ç : Click and release the apostrophe key [‘] and then the [c] key


This covers all of the French accents and diacritics, and according to the language you are teaching you will want to show different accents. All accents and diacritics for any alphabetical language are available using this method. You may see some of these by pressing [alt gr] on your keyboard with the on-screen keyboard displayed on your screen. All accents and diacritics typing follow the same logic though, with the diacritic typed and released, and then the letter it is to be added to.

Materials:

Sample Google document: https://docs.google.com/document/d/15e4N-uIuTDFfWq-k_cv1fp_3bBuoFDJf7s-OZdMBb6Y/edit?usp=sharing

Autocues for language learning: linguistic immersion, employability, and a transferable end-product.

Recently I went to Southampton University to present at the LLAS annual Symposium for E-Learning. The conferences there are always fantastic for educational professionals using technology for language learning. It’s like breathing pure oxygen for us, since a lot of the time in our respective departments we are battling to find ground with the traditional courses. Often it works-out too, since really there is a lot that both traditional and technology bound education can offer each other, though it is not always clear at the outset, and we can get a bit polarized into an either/ or attitude.

The project for autocues stemmed out of teaching 3rd year undergraduates’ oral classes. Luckily the module coordinator for this module is very encouraging and can see the point of my endeavours. This was the 3rd year of developing the project, and I can say that it really reached an apogee when the Studio Graphic was introduced, as opposed to filming on a very plain background.

Without further ado, I’ll let you get into the evolution of the project with the links below. Please note that this was the first time I was filmed at a conference and excuse my enthusiasm when it seems to boil over. The fact that the project really took-off this year meant I was full of beans, as anyone would be with new things coming into being!!!

Abstract:

Autocues/ teleprompters are a linguistic support for video presentations that allow students to focus on their oral delivery and pronunciation whilst reading from their own corrected texts. The aim in using teleprompters in a language context is to increase the confidence of the student before an oral exam, to provide an opportunity for linguistic improvement at both oral and written levels, and give students an end-product that is both transferable and powerful in terms of employability. Via teleprompting, the student is also given the opportunity to act from within a linguistically immersed situation.

The use of autocues specifically for language learning is an innovation that recalls the use of subtitling and audio description as linguistically immersive techniques working through media interpretation tools. Because the precedents for using auto cues are few and vague the project has undergone a certain evolution since its inception 3 years ago. A green screen graphic has been added to the otherwise plain background of the studio, giving the finished product a sleek and professional appearance, Google documents are now being used for corrections and preparations, thereby increasing accessibility of the presentations and speed of correction turn-around, and this year feedback was collected from students to establish the popularity of the project as well as its linguistic value, and to give students the opportunity to make suggestions for improvements.

The project is composed of 3 main parts:

  • Composing the text for the teleprompter:
    • The student has to establish his/ her preferred subject and write a presentation of approx. 700 words (1 page single spaced). This step gives the student a chance to find a subject he/ she is interested in, and develop a certain intellectual autonomy.
    • A link to the shared Google document of the presentation is placed in the table of another Google document, to which all students have access. This enables the tutor to correct the presentation whilst students can prepare questions for each other by reading each others’ documents.
    • Once the mistakes in the shared Google document have been pointed-out by the tutor, the student attends to the corrections.
    • Presentations are read in class, and students can ask the presenter questions.
  • Presenting the text in the studio:
    • The student reads a self-corrected text in the target language from the teleprompter.
    • The discussion is opened-up to the panel and the floor.
  • Round-up of the presentations:
    • Students view sections of their presentations in class and go over ways of improving them, whilst also discussing their topic further.
    • Students have access to all videos via a streaming server and watch each others’ videos.

This session will showcase the use of teleprompters for language learning via video examples,

look at student feedback in order to establish the possible scope of the activity, describe the different processes involved in detail, and give insight into the evolution of the project.

Powerpoint presentation used at the conference:

N.B. Since not all of the links work via SlideShare I include a link for you to download the Microsoft PowerPoint presentation here: Autocues for language learning

Video of presentation at LLAS E-learning symposium 2013:

Link to Southampton LLAS E-Learning Symposium video page: https://www.llas.ac.uk/video/6740

References:

LLAS E-learning symposium 2013: http://www.llas.ac.uk/events/6636

N.B. There is very little literature or academic articles concerning Autocues for Language Learning. I did find one article at the Swansea University library where a Professor in the early 70’s,  during the trend of Area Studies, had used them for his language class, though in a different context. I’ll post link to it here once digitized, since it is worth the read, if only for nostalgic reasons.

Acknowledgements:

Thank you to Professor Connon for always encouraging any new and innovative trend in the MLF330 oral class schedule at Swansea University, department of Languages Translation and Communication. Many thank to Dayve Fresco, for his unerring determination and support in the technical department. Also to Professor Andy Rothwell for always pushing and encouraging the use of technology for Language Learning.

Subtitling, audio description and dubbing for 2nd year undergraduates.

The clip below is the product of a 1 semester, 10 hour long lab module  with 2nd year undergraduate students. In groups of 3, students had to choose a video from YouTube on the theme of ‘Interview Techniques’/ ‘Aplying for jobs’, convert the video online, create subtitles, dubbing, multi-modal descriptions or audio descriptions.

Some students were a bit reluctant to delve into the technology whereas others found it easy and enjoyed it, though by the end of the process all of them would have learned how to subtitle, provide basic dubbing or audio description, and most importantly, would have made a glossary of terms on the themes of looking for jobs/ interviews.

Subtitling: Miriam Phillips

Dubbing: Timothy Early

Facebook for (language) learning. (LLAS workshop at UCL language centre)

ImageIn London, at the UCL Language Centre, the participants of the workshop “Using Facebook for (language) learning” worked all day ( 12-5) on producing practical language immersion techniques to include as activities within Facebook.

We managed to complete the following activities:

  • Creating a fictitious character’s profile
  • Describing a family outing using YouTube videos
  • Creating sub-pages to act as content repository pages to a course
  • Using polled questions to promote inquisitive learning
  • Using Dropbox to create links to activity files
  • Using shared Google documents for activity preparation
  • Creating a commented video from photos downloaded from the internet using Windows Movie Maker 2.6

At 1pm, whilst the workshop participants were working on their 1st activity,  I connected simultaneously with my lab class at Swansea University using a shared Google Document, and was able to tell them about the activity they had to do in their 50 mn session. I provided them with a link from Dropbox to a Word document describing the session’s activity, by pasting the link into the Google document ( that updates in real-time), and could make sure they understood what they should be doing. It was fun to connect with 20 my students in a lab 157 miles away by using this simple real-time co-editing method provided by Google Documents

The workshop re-affirmed for me how practical and flexible Facebook is as a teaching and immersion medium/ tool.

After the workshop one of the organisers was genuinely asking for opinions with regards teaching grammar, since it was something she was providing in her classes, but was not really sure how helpful it was for the students ( especially in German since there are so many cases and exceptions).

As a lover of grammar and linguistics I found this quite difficult to answer, though with the help of a Japanese tutor from King’s we finally came-up with a useful analogy based on learning how to walk or swim: when we are learning how to walk or swim we are encouraged to practice these activities as much as possible. We do not learn about the mechanics involved in walking nor the laws of buoyancy at the outset. Perhaps if we were Olympian athletes doing the 50km walk or the 10km freestyle, we would look into principles of momentum and Archimedes’ principle of floatation, though even then they would not be necessary to complete races.

On that basis, why would grammar be necessary to learn a language? Surely we would do better just to practise it. After mastery of the language, if we were so inclined, we could go back and learn the principles governing it.

Back in Swansea the next morning after a hectic nocturnal train journey, we continued our activities using Facebook. As the students produced content and comments for their activity, I could correct them immediately with the help of Facebook notifications. I was also having conversations in French with the students using Facebook chat.

Social networks are more flexible for interaction than conventional VLE’s and CMS’s such as Blackboard or Moodle. Creating pages to add to a profile in Facebook also solves the problem of course building, and enables students to add content separate from their main page. Social networks are also free and independent from institutional access problems. Neither do they have as many maintenance issues. Facebook, up till now, has been completely reliable, and it continues to add features that enable faster communication and updating.

I’ll soon be developing activities using Google+. The advantage of using Google is that only one log in is required to access all of its tools: Google +, Google docs, YouTube and Gmail. The problem in developing this method of immersive teaching is that its potential is only realized with use, when 20+ students are all connecting on one network. Facebook is very well developed and we are all familiar with how it works. It has less tools than Google for now ( such as Google Documents), though with its highly ambitious aims, and because it is in direct competition with Google ( on the stock market soon), we might yet see the sort of developments within Facebook that has made Google so ubiquitous. Facebook is a lot of people’s first port of call on the internet ( from their mobile app.). Will they soon be providing a browser-free experience that will include all the most common productivity tools? Is this the next step in Internet development, or will Facebook just focus on being the most developed Social Network?

1slidevideo

I. One slide videos for language immersion:

One slide video adventures are a way for students and teachers to create linguistic adventures and virtual causalities in the target language.

The creation of interactive video adventures reinforces the practical application of language on situations that are decided by the learner. The creative aspect of the activity leads to self-reliance and autonomy in the target language, and simulates freedom of choice and individual judgement.
During this tutorial the instructor will guide you through the creation of a video adventure that you will then be able to implement in a lab class. The possibilities and outcomes of these adventures are infinite, and can focus specifically on grammar or vocabulary points, as specified by a tutor.
II. Creating a ‘One slide video adventure’

For creating one slide video adventure you will need to have a YouTube account. If you do not have one, please create one.
In this first activity you will be using ready-made slides ( The Star Trek Adventure) upon which you will add your narrations with Windows Movie Maker 2.6. Although the instructor will be guiding you step by step, you may find the following written tutorial useful: Click her for Windows Movie Maker 2.6 Instructions ( Word document)
So that you may become familiar with YouTube annotations, I suggest that you adapt/ translate each slide of the following example into your teaching language: Star Trek (Seeing an Alien)
Activity 1:
1. View pre-made video adventure: Star Trek (Seeing an Alien)
2. Right click as ‘Save as’ to Desktop the following files:


3. Open Windows Movie Maker 2.6 ( Download instructions here)
4. Since this is your first video adventure I suggest that you base you narrations loosely on the following example, though in the language that you teach:
5. Record audio descriptions onto clips and save the movies to ‘Desktop’. If you name your files Clip 1-Clip 4 it will be easier later.

6. Upload Clips to your YouTube channel.

7. Produce annotations in YouTube. ( Click here for Word document tutorial)

Appendix: Still slides for activity 1 ( right click as ‘Save Link as’ > Desktop):


Activity 2:

In this activity you will be given free rein of all aspects of the video adventure: plot, subject, theme and type of adventure. Here is an example of an interactive video adventure that focuses on the topic of food and shopping.

1. Choose pictures online by researching your desired subject in Google Image Search

2. Import the still pictures into Windows Movie Maker 2.6 and follow the tutorial to add an oral narration/ commentary to the pictures. ( See Windows Movie Maker 2.6 Tutorial)

3. Follow steps 5-7 of Activity 1


N.B. Please use these tutorials and clips for educational purposes only.